Since you can post videos in your Smilebox, it is a great way for grandparents, aunts, uncles, and cousins to see what your little one has been up to recently.
 |
| Make a Smilebox scrapbook |
How to make a Smilebox Scrapbook
- Go to Smilebox.com and create an account.
- Install the software.
- On Step 1 Choose, scroll down the the Design Catalog and choose Scrapbooks.
- Find a design you like.
- Now you are on Step 2 Personalize. Smilebox will often pull your most recently saved pictures into the Photo Selection Box (on the left side of the screen). If the photos you wish to use are not there, add them by clicking on the Add Photos button.
- Once you are finished adding your photo's, it is time to get started creating your scrapbook.
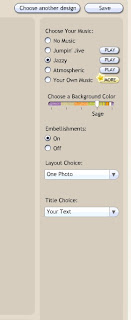
The right hand side is where you customize your pages. - Select your music for your scrapbook.
- Choose the layout for each of your photos.
- Choose your background.
- Choose your embellishment level.
- Choose the page title
- Customize any text.
- Once you have finished creating all of your pages, save your work. By clicking the Save button.
- Click on Step 3 Preview, and preview your scrapbook. Make sure everything looks the way you want it to. Check for typo's.

- Once you are satisfied with your scrapbook, click on Step 4 Share, Print, or DVD.


No comments:
Post a Comment